Friday, June 20, 2014

Alternative Die Cutting Materials


Hello! I went to the Scrapbook Expo show today in Chantilly VA. I always enjoy scrapbook shows because I get to see things I've never seen before, and purchase things I just can't find in my local area. Today I had a real treat listening to a lady named Ellen, at the Tessler Stamps/Stencils Company. Ellen was very enthusiastic about their products and encouraged everyone to "think outside the box" for die cutting materials. I think the only things I've die cut so far are paper, cork sheets, and fun foam. Well - are you ready for this? - she was die cutting butterflies out of soda cans!!! I could hardly believe it! When I think of all the soda cans we've thrown away over the years!

When I got home, I looked up die cutting soda cans on You-Tube, and here is a tutorial by someone else (I didn't see one by Ellen anywhere) on how to cut the can. It's really not hard at all - you just have to be careful not to cut yourself. It probably would be good to wear a pair of gardening gloves or something while you are handling the can.


At the show, Ellen cut the soda can with a delicate butterfly die they sold and you couldn't tell it was even a soda can! I thought I would come home and try this out with a couple Papertrey dies. When choosing your die, I like to choose something that is not too solid, so that it's not obvious that it was cut from a soda can - unless that's the look you are going for. I chose three dies to try - one of the Delicate Doilies, Pedal Pusher, and a Monthly Moments month word. You can see them below.
 The sandwich I used with my Big Shot was the Multipurpose platform, cutting plate, a metal shim,   the die cut facing up, the soda can, and the other cutting plate. I found it handy to tape the die cut to the can to stop it from moving around. I ran this through 2-3 times back and forwards. The Doily die was tough to get out of the die - just hard to find a place to lift it up. The other two came out really easy. You can see where the solid parts of the die cuts are - like the bike wheels and the middle of the doily - you can more easily tell what it is cut from. But with the February die cut - there is no way you would know. Luckily, the dies seem to round the edges of the cut so they are not sharp on the edges. I still would never give a die cut like this on anything going to a child.

The dragonflies and butterflies in this picture are cut from a Pepsi can. The dragonflies are die cuts sold at the Tessler booth labeled "Ellentina Cutting Dies". These particular dies are "Dragonflies."
 This set of die cuts is cut from American Crafts WOW glitter paper. This paper cuts like butter! These leaves are also dies  by Ellentina . The leaves are called Daisy leaves, and they emboss the veins going down the middle of the leaf. The butterfly here and above, is also by Ellentina, called Butterflies #4.

These snowflakes are cut from good old Wax Paper!! They are so delicate! After cutting them (you can cut several layers at a time), I applied some glue with a brush and sprinkled glitter on them. So soft and pretty!

So start thinking out of the box as far as die cutting materials! One caution I would use, is NEVER to force a sandwich through your die cutting machine - if it doesn't go through smoothly, it's too thick! Also - BE CAREFUL WHEN CUTTING THE SODA CANS AND HANDLING THEM!

Thursday, June 19, 2014

2014 Father's Day cards

Hello! I wanted to share the Father's Day cards I made this year, mostly using cut files from the Silhouette store. The first one is for one of my son-in-laws. He is very handy around the house and there isn't a tool he doesn't have. I thought he would enjoy this card, along with a Home Depot gift card.

 And this next one was for my second son-in-law, who loves to grill outside. They eat alot of really healthy food, thus the artichoke on the inside. He also got a Home Depot gift card.
 Back of card


 This one is for my Father-in-law. He is pretty old school, and I made this from the Papertrey set Handy Hardware. I also used some patterned paper from a 6x6 pad for the rulers.
And last, but not least, is this one I made for my husband, who is an avid fly fisherman. I used a
WPlus9 set - Fish and More - for the accessories, and a free cut file for the vest, gotten from Dawn's blog here.
Did you make any Father's Day cards this year? Although my dad has passed away, I still make them for other Father's - the father of my kids, the fathers of my grandkids, and my husband's father. I think they deserve some special recognition of their day too! Have a great day!

Papertrey MIM #168: Combining Chalk and stamps with Impression Plates

Hello! I am joining in on Melissa Phillip's Make-It-Monday over on Nicole Heady's blog here. I have three palletes of Pebbles chalk, and I love when I use them, but I've not used them in a while. So this gave me a chance to pull them out and try a new technique.
 I used the cane impression plate, the Frilly Flowers stamps, and several Papertrey colors, as well as the Text Block : Baby, which I added lots of glitter to. Hope you can see how it sparkles.
I found that by the time I added the stamping to the background, it was kind of hard to see the chalking. It was really pretty when it was first applied - it just kind of got covered up. I like the way the impression plate shows through the stamping! I need to pull these chalks out more often! Thanks for looking!

Sunday, June 8, 2014

Another Papertrey Coin Purse

Hello! I wanted to share another Papertrey coin purse I made. I have been having fun making them and thinking up new possibilities for the decorations. You can see two other purses I made for my granddaughters here.


 This time I cut the main body of the purse from Papertrey black felt. I used the Lovely Layers dies to cut out pieces of Aqua Mist and Limeade Ice felt for the decorations on one side, and Matt Stack 1 and the Headline Alphabet to cut out a base and my initials for the other side. I just used a whipstitch to sew the pieces down to the felt since they are not stitching dies. This opens up a whole new realm of decorating possibilities when you do not limit yourself to the stitching dies! I used a zipper and stitching in an Aqua Mist type color for contrast to the black. What do you think?

Papertrey Make-It-Monday #167 DIY Notebooks

Hello! I really enjoyed this week's Papertrey Make--It-Monday done by Erin Lincoln! She showed us how to make our own little notebooks. These will make such cute little gifts for people! IF I can give any away! They are just so cute!

My first notebook uses some owl stamps I recently purchased from Darcie's Heart and Home at my local scrapbook store. These owls are just the cutest thing EVER! Can you tell I love owls??? I colored them in with Copics.

I used up a lot of scrap cardstock I had on hand because I couldn't bear to use up my precious PTI cardstock on the pages. I used Papertrey Aqua Mist patterned paper for the outside cover. 


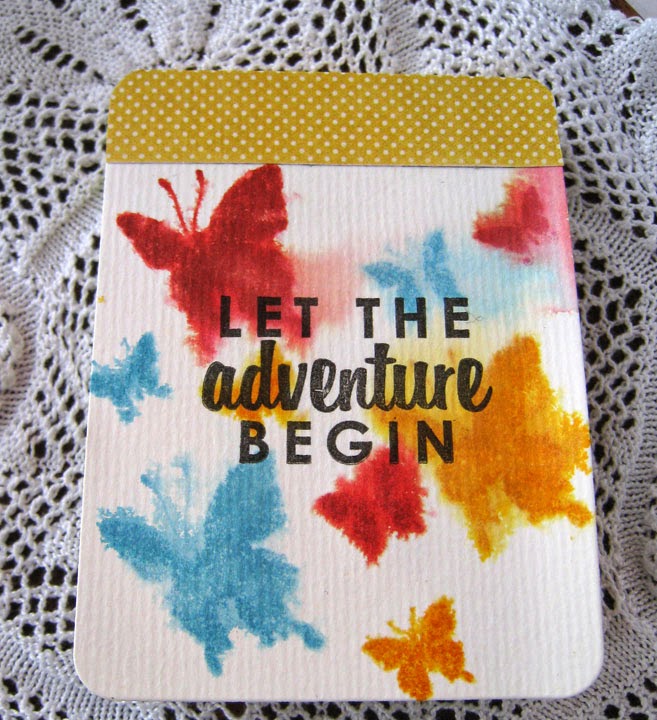
 The second notebook I made used Beautiful Butterflies and a watercolor stamping technique. Not sure how I feel about the looseness of it. The sentiment is from PTI's Sweet Cheeks set. Again, I used scrap cardstock for the inside.


Hope you enjoyed these little notebooks! Did you make any? There are soooo many cute ones over on Nicole's blog! Thanks for stopping by!

Monday, June 2, 2014

Colorful Cubes Quilt

Hello! I hope you are having a great day today! I wanted to share a quilt with you that I made as a result of a workshop I took at my quilt guild. The workshop was taught by Josephine Millett, a member of our guild. We used the pattern Colorful Cubes, by ItsSewSue Patterns. The optical illusion of the empty 3D cubes is achieved by using a light, medium, and dark fabric for each cube, placed in a specific location on each cube. I chose to use leftover fabric from my cubes to make a piano key border for the quilt. This pattern is similar to Tumbling Blocks in the 3D illusion it gives.

 It was a fun class and I was really motivated to finish it at home! It measures about 45" square. I am thinking of giving it to a little boy in our church that has been receiving chemo treatments for cancer. I know you often get cold while getting treatments, and I thought this "quilt of many colors" might keep him warm, and remind him how much God loves him.

Do you quilt? Have you ever tried a 3D quilt? It's alot of fun as long as you follow the directions to a tee. Thanks for stopping by my blog!

Graduation Time!

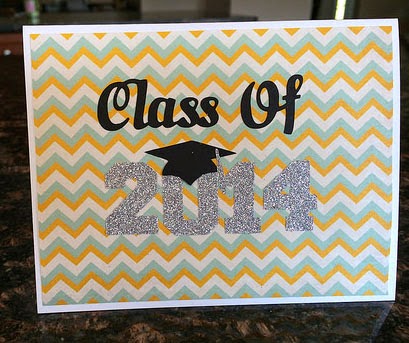
Hello! Thanks for stopping by my blog today! I have a few people in my circle of family and friends - probably like you - that are graduating this year. This came upon me quickly this year. Since my kids are all grown and out of school, and I'm not normally thinking about the end of the school year. I have a couple stamp sets for graduations, but decided this year to use some grad images from the Silhouette Online store. Here are a couple of the cards I made:


  I used the following shapes in the Silhouette Store: Class of 2014 #58303, and Congrats Grad Phrase #60294, as well as patterned paper from the Fancy Pants Park Bench paper pad and some American Crafts Christmas glitter paper (cuts beautifully on the Cameo!).

Hope you are having a good day today! Have you made any graduation cards this year?