Friday, April 25, 2014

Papertrey April Blog Hop Challenge - Embroidery Inspiration

Hello! I am participating in the Papertrey April Blog Hop. This month the inspiration for the Hop is Embroidery. I love to do embroidery, so this challenge was right up my alley. Here is the inspiration photos Nicole posted on her blog:
April-Blog-Hop-Inspiration
In Nicole's words:
"This month we challenge you to look at embroidered patterns in a whole new light!  Look through your clothes, Pinterest, home decor catalogs or even the inspiration I have provided above and find an embroidered pattern that speaks to you.  Using the colors and design of the embroidery, build your own stamped version using your favorite floral stamps or other images.  No stitching required! "

I have three cards for this Hop - hope you can stick with me and see them all!

This is my first inspiration photo, which I got from Pinterest here. I love Leanne Beasley's embroidery patterns. Unfortunately, I haven't been able to find them here in the U.S.
Butterfly Garden - Close Up
As soon as I saw this, it reminded me of Flutterby Friend. So I went to work and came up with this card, inspired by the butterfly, and the line images. Here is my first card:


My next card was inspired by this linen bag on Etsy:
Linen bag with strawberry embroidery

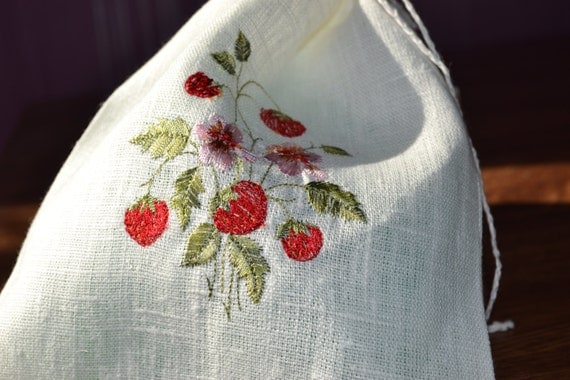
I had embroidered some napkins about 2 years ago using the Strawberry Patch stamp set as my guide. I pulled out one of the napkins I had left over and cut a square with the embroidery. I backed it with some stuffing to puff it up and attached it to my card front through a cut out window. As in the inspiration piece, my embroidery was also done on linen.


My third card was inspired by old time cross stitch samplers. I'm not sure if they qualify as embroidery, but they were definitely done with needle and thread. Here is one of the samplers I have pinned on my Embroider board on Pinterest:
 and from denmark, a pattern I could actually work myself.  @Jacob de Graaf on etsy has some cool patterns
I was inspired by the red and white stitchery and noticed that  most samplers include an alphabet. I pulled out my Stitched Alphabet and Stitched Sentiment sets and set to work. I added a little vintage lace to the top and bottom to add some character.
Thanks for sticking with me through this long post! Enjoy the rest of the blog hop!

Tuesday, April 22, 2014

Papertrey Make-It-Monday #161 - Watercolor Splats

Hello! I enjoyed watching Nicole's Make-it-Monday video on her blog about making splotches with watercolor and your dye inks yesterday. I thought I would give it a try. I needed a birthday card for my daughter, who is very artistic, and I thought this technique would be good for her card.
I used Pure Poppy, Berry Sorbet, Hibiscus Burst and Sweet Blush in the background.  When I stamped the Happy sentiment (from Wet paint), it kind of messed up on the areas where there were splotches. But then I decided that added to the "artsyness" of it, so I let it go. I used Bold Bouquet for the flowers. I matted the watercolor layer with a black and Berry Sorbet layer, and then mounted that onto a white card base. This technique is kind of fun - I think I may try it again! Thanks f  taking peek!

Thursday, April 10, 2014

Zoo Book for granddaughters

Hello! My daughter and I are going to take my two granddaughters to the National Zoo this weekend. Chloe is 2 1/2 years old, and Sophie is a little over 1 year. So I was trying to come up with something to document our trip and be fun for the girls. Chloe will do most of the work on this little book at the zoo because Sophie is still a little young for stickers. What I came up with is a Zoo sticker book. I used a Silhouette store design for the little book #25504 by Lori Whitlock. I cut out 10 pages for the book from yellow cardstock. Then I used some printable graphics from the Noah's Ark collection at Lettering Delights to highlight one animal per page. I also made matching stickers of each animal from sticker paper. The idea is that when we see a certain animal at the zoo, she will take the sticker and put it over the picture of the animal in the book. Hopefully I will get pictures of each animal and be able to print little pictures to put on the page also. I included two pages in the back of the book for the stickers, and three glassine envelopes with extra stickers and storage for little things we might pick up while there. Without further ado, let me show you how it turned out.

 Page 1
 Page 2-3
 Page 4-5
 Page 6-7
 page 8-9
 Page 10-11
 Page 12-13
Page 14 and first page of stickers
 Second page of stickers and glassine envelope with extra stickers
 Two more glassine envelopes for souvenirs.
Back of album

I bound the album with ribbon. I tried using 1" rings, but it was too bulky. As I was writing this up, I see I am missing the elephant and toucan stickers. I need to go add them in. Good grief! Luckily, it's easy to add pages. :)
Anyway, I think it's going to be a fun trip, and I hope the girls have fun with this little sticker book. Thanks for "sticking" with me!

Tuesday, April 8, 2014

Papertrey Make-It-Monday #159 - No-Sew Quilted Cards

Hello! I knew when I first saw the title to this week's Make-It-Monday over on Nicole's blog, that this challenge was right up my alley. I am a quilter as well as a card maker, so I was excited to see what I could come up with. I love miniature quilts, and often, when making a normal bed size quilt, I scale it down to make a matching miniature quilt. So Dawn's card using 1 1/2" squares inspired me to use 3/4" squares.

I am currently in the process of making a "first year" mini album for one of my granddaughters, and I am using the Egg Hunt paper pack by Papertrey throughout it. It's so nice to have papers from a pack that you know will all look good together. It's kind of the same way when you make a quilt. Most manufacturers have different "collections" of fabrics, all coordinating. When you purchase fabric all from a particular collection, you know they will look good together. 
 
 I had a bunch of scraps from the Egg Hunt paper pack, plus a few coordinating papers from Papertrey pattern packs, and I decided to get out my 3/4" square punch and make my quilted card. I started out by punching 10 squares of each paper. I drew a line from corner to corner diagonally, and laid out my first line of paper squares. After that, it was easy to repeat the pattern for the rest of the card. I then put a tiny purple border around it (like you would on a quilt), and mounted it on a white card base. The quilted part of the card was impressed with the Damask impression plate. I ran it through several times to get a nice impression. I just LOVE the quilted look this gives!


I decided to use Stitched Sentiments and the coordinating dies to make a "label" for my quilt. I put my initials on the hooped "fabric" and a banner with "Handmade is best" from Button Boutique underneath it. I think this is one of my favorite cards I have ever made! Thanks for the idea Dawn!