Tuesday, December 20, 2016

Where Creativity Meets C9 Challenge #4: Winter

Hello! I found a few minutes to make some tags to enter the Concord and 9th "Where creativity meets C9" challenge. The challenge this month is "winter".

My first tag uses the large tree from the "Christmas Cottage" stamp set, along with a sentiment from the same set. I used two different green dye inks to stamp the tree, then used a water brush to watercolor over it. The tree looks so wintery with the snow on it - I thought it could be used all winter instead of just Christmas!
My second tag also uses tress from that same "Christmas Cottage set", but this time I used the smaller trees as a border on the bottom of the tag. I stamped the trees in green inks and watercolored around the trees and the sentiment. The sentiment is from the "Holy Night" set.
My last tag uses the Mary figurine from "Holy Night", which I watercolored using Zig markers. I also watercolored blues in the background as a starry night backdrop for her. The sentiment is from "Holy Night" also.
Thanks for stopping by to take a peek at my tags! I think I will put these on a couple of the special gifts under the tree!

Tuesday, October 25, 2016

Papertrey October 2016 Blog Hop

Hello! Nicole challenged us with a beautiful autumn picture for the Blog Hop this month. You can read about it on her blog.

 
I am just popping in to participate in the Hop this month. I loved the colors of the pumpkins and the musical paper.
I used this month's Inspired: Hope die and stamp set,  some musical patterned paper I had, as well as the Turning a New Leaf set and dies. I cut the leaves from Ocean Tides and stamped them with Olive Twist - such a pretty combination! The twine tied to the tag represents the twigs in the inspiration picture. Thanks for stopping by! Hope you are having fun hopping around! 

Sunday, September 18, 2016

Second Concord and 9th 3D card

Hello! Here is another card for the Concord and 9th "Where Creativity Meets C9" challenge. It uses the Christmas Cottage stamps and dies. The trees and house are stamped and then watercolored. I created the background with colored pencils and a water brush.  I added "snow" to the trees and the ground using a sparkly white paint. In real life it really shines!
I am entering this in the Where Creativity Meets C9 Challenge since it celebrates Christmas. The challenge this month is Celebrations. Thanks for stopping by!

Concord and 9th 3D Chrismas card

Hello! I had fun playing with my new Concord and 9th Christmas stamps today! I just love these stamps and the dies that make 3D cards! So innovative! I decided to cut my card panels out of watercolor card stock so I could watercolor them. I used watercolor pencils and then blended with a water brush. I loved making the starry backgrounds!
 This is made with the Holy Night stamps and dies. There are no stamps for the figures, so I did the best I could to watercolor them.

I am entering these in the Where Creativity Meets C9 Challenge since it celebrates Christmas. The challenge this month is Celebrations. Thanks for stopping by!

Wednesday, September 14, 2016

Papertrey Create Along With Us: September 2016

Hello! I have been so inspired (and overwhelmed) by all the gorgeousness going on in Papertrey land this month! It was hard to narrow down this challenge to just one card to case. You can read all about the challenge here on Nicole's blog. I ultimately chose to case this card by Dawn McVey. I just love the way she used the bookmark die in a different way.
Here is my rendition of it. I used the O Holy Night stamp set, the Bookmark 3 die, and Petite Places: Nativity. The background was stamped with a beautiful flourish in the Silent Night set (an oldie).
I just love how this turned out and will be using this design again! Thanks Dawn!

Celebrate with Concord and 9th - Second card


Hello! Here is my second card for the Creativity meets 9th challenge over at Concord and 9th. You can read all about the challenge here: http://www.wherecreativitymeetsc9.com/ch1/

This is a fall birthday card for my friend. It is celebrating her! 
This card uses the Layering Leaves dies, the Beautiful You die, and a tiny tag made using a Bags and Tags die. I stenciled some leaves in the background using a Papertrey stencil. Thanks for stopping by! You can find Concord and 9th here: http://concordand9th.com/

Celebrate with Concord and 9th


Hello! I have recently discovered Concord and 9th - a relatively new stamp company. Their stamp sets and dies prove to be innovative and unique. I love the way they think out their designs so well to be used in many different ways. In their September release, they came out with dies and stamps to make 3 dimensional cards with Christmas themes! Both of those bundles are on the way to me, and I will be blogging about them soon. Love this design - just one more example of their innovative designs.

During the month of September, Concord and 9th is having a Celebration challenge as part of Creativity meets C9. You can read about it here http://www.wherecreativitymeetsc9.com/ch1/ 


Here is one of my cards for this challenge: It is a celebration of fall. I made a shaker card using the Layering Leaves dies. I cut the leaves from the card base, then inserted different colored ones back in. I backed the base with clear cardstock and made a shaker out of it. I filled it with little gold beads. It's hard to see the sparkle in this picture, but it really shakes and sparkles great! I just love how this turned out! 

Thanks for stopping by! Now go out and check out Concord and 9th here: http://concordand9th.com/

Friday, September 9, 2016

Papertrey Make-it-Monday #260 - From Black and White to Color

Hello! I had fun making a card for Papertrey's Make-it-Monday this week! When isn't it fun to color??? Danielle Flanders made us a video this week showing us how to divide up a card front image and color only parts of it. She went from black and white to color, I went from color  to black and white, back to color, back to black and white. It was a little confusing, but fun. I have always loved coloring Doodlie Doo, and this time was no exception.You have to look at it pretty closely to figure out what's going on!
I used the rectangular dies in the A2 set from Betsy's "Noted" Make-it-Market kit to cut the sections out. Thanks for stopping by!

Saturday, September 3, 2016

Felt colors

I photographed these felt colors as a favor for a friend on the Papertrey forum.

Tuesday, August 30, 2016

Papertrey Make It Monday #259 - Ombre Cluster Stamping

Hello! I made a quick card for this week's Make-it-Monday over on Nicole's blog. Dawn showed us how to stamp a cluster of images in various ombre shades of a color. I like this technique and decided to give it a try.
I used Beautiful Butterflies (a classic!) to make a sympathy card. Blue butterflies always remind me of Hospice, which usually mean you will be needing a sympathy card fairly soon. :( We are going though that with my father-in-law right now. Hospice is a wonderful organization! So caring and supportive - very special people!
Anyway, here is my card for this week's challenge:
A simple card. I did distress the edges - does anyone else do that anymore??? Thanks for stopping by!

Wednesday, August 24, 2016

Garden Gate Penny Rug

Hello! I purchased the Garden Gate Make-it-Market kit, designed by Betsy Veldman for Papertrey Ink, a month or so ago, and the gate die in the kit was screaming to me to cut it out of felt. I thought about it for a while, and decided to make a penny rug using the gate and some of the flowers in the kit. This was a project that developed as I went, not a whole lot of pre-planning here.

I started by cutting out the gate from Papertrey's Vintage Cream felt. It cut beautifully!! I laid the gate on a piece of felted wool in my stash (and yes, I have a HUGE stash of wool!). I decided to cut out an 8" circle of wool for the center of the penny rug. I attached the gate with small dots of glue (Roxanne Baste it), and then blanket stitched the edges with Ecru floss (2 strands). The inside lattice was stitched with a whipstitch.


Next came the wisteria. I used the wisteria die cuts from the kit as my inspiration, and stitched the vine to the top of the gate using a stem stitch for the vine, french knots for the flowers, and striaght stitches for the leaves. I used varigated Weeks Dye Works floss to achieve the variety in color.

I then proceeded to figure out how to replicate the hollyhocks. I ended up using two of the smallest dies in the Mini Blooms die set to cut the blooms and leaves out of Papertrey Hibiscus Burst, Autumn Rose, Lemon Tart, and Spring Moss felt. I attached them with french knots, embellished the leaves and flower centers with small straight stitches. I filled in around the blossoms with green french knots to represent the greenery.


The final element I wanted to incorporate into the rug was the bleeding hearts. I LOVE bleeding hearts (the flowers, not the people!). The gate scene was already pretty full - I didn't want to cover up the gate too much, so I decided to put "bleeding" hearts on the pennies surrounding the rug. I used a heart from the Heart-to-Heart series for the larger light pink heart (Sweet Blush felt), and a smaller heart from Flipping Out (Autumn Rose felt). These were attached to 10 pennies with a whip stitch.  Then I added the stamens with straight stitches and french knots in a light yellow floss (DMC).


Then I assembled the penny rug by first backing the center with another piece of 8" round felted wool with a blanket stitch. This hides all the ugly stitching on the back.
Next, I backed each penny with another penny with a blanket stitch. This hides the stitching (of the bleeding hearts ones), and adds some weight to match the weight of the center.
Next step was to attach the pennies to the center circle. This was a bit tricky, even though I have made several penny rugs before. I basted each penny to the center with white thread on the front of the rug. Then, I flipped the rug over and whipstitched the pennys to the center, and to each other with black pearl cotton floss. The reason the stitch from the back, is to hide the whipsitching.
The front was complete! One thing that is important to me in quilting is to label the back of each quilt I make with details about the inspiration, what was going on at the time, my name and the date the quilt was made, etc. 100 years from now, when I am gone, my grandkids will hopefully be able to read those labels and learn a little more about why and when that quilt was made.
Saying all that, I decided to label the back of this little penny rug. I wanted to give Betsy Veldman and Papertrey credit for their designs, and have a scripture verse to represent my faith. I chose to use Psalm 100:4-5, since it referred to gates, and it spoke of the goodness of God.

"Enter his gates with thanksgiving, and his courts with praise; give thanks to him and praise his name. For the Lord is good and his love endures forever; his faithfulness continues through all generations. " Psalm 100:4-5 
 I used a feather stitch to attach the label to the back of the rug.
 I actually stamped the wisteria on the label using stamps in the kit.
 Credit to Betsy and Papertrey.
Now it is complete! Hope you enjoyed this explanation of how it was made! I think it is one of my favorite things I have ever made! Thanks for sticking with me through this long post!

Tuesday, August 9, 2016

Quilted Watercolor cards

Hello! I was reminded today of some stamp sets and dies that I purchased from Papertrey last year. Melissa, one of the Papertrey Design Team, posted on the Papertrey Forum that she was looking forward to pulling out her Quilted: Autumn set to start creating for fall. This reminded me of a set of cards I made last year once I had collected all four season's Quilted sets. Being a quilter, they were a must-have series of stamps and dies! :) I decided to watercolor a background for the dies and keep them fairly simple. I just love how they turned out!

Quilted: Winter
 Quilted: Fall
 Quilted: Spring
 Quilted: Summer
Now to send these out to some of my quilting friends! Hope you enjoyed them too!

Thursday, July 28, 2016

Foiled picture

Hello! I was experimenting with my laser printer and Minc machine last night. I took a picture of my granddaughter in Photoshop and applied a filter to make it a line drawing. I printed it out on my laser printer and ran it through my Minc machine with copper foil. It turned out really cool! I will have to try more of this!

Monday, July 25, 2016

July 2016 Papertrey Blog Hop

Hello! I had a little time today to make a card for the Papertrey Blog Hop. This is the inspiration photo over on Nicole's blog.

I decided to go with the colors in this photo, using Aqua Mist, Melon Berry, white and gray. I pulled out a set I haven't used in a while - Pedal Pusher - to make my card. I also used the Blue Skies coverplate. 
 
Hope you enjoy the Hop - thanks for stopping by!

Sunday, July 24, 2016

Papertrey Stamp-a-faire 2016: Master Color Recipes

Hello! I am so excited about Stamp-a-faire this year! I am participating at home this year and hope to learn alot of new techniques - from the Papertrey Masters!

The first challenge of the day on Saturday was to make a card using colors inspired by paintings by the Masters. We were given a list of paintings and PTI colors to use with each one. I chose "Date in the Park" by Leonid Afremov:


This is the card I came up with using PTI colors Scarlet Jewel, Terracotta Tile, Tropical Teal, New Leaf and Summer Sunrise. I also added a few lighter versions of these colors to fill in spaces. The black tree trunks are represented by the balloon lines. I added lots of Wink of Stella shimmer to the balloons, which is what you see in the picture as white dots.

Papertrey Stamp-a-faire: Team Farewell

Hello! I really enjoyed Stamp-a-faire Day this year! I was at home by myself today and was able to keep up with most of the challenges during the day. I haven't been able to participate the last few years, but am glad I set the day aside this year. The Design Team videos were superb - I learned so much! Thank you Nicole and the Design Team for all you did to make this day a reality! 

Here are my cards from Stamp-a-faire 2016:
 I know I will be doing these techniques again! Susan :)

Papertrey Stamp-a-faire: Color Blocking with Lexi Daily

Hello! I am so excited about Stamp-a-faire this year! I am participating at home this year and hope to learn alot of new techniques - from the Papertrey Masters!

This is a card for Saturday's Color Blocking with Lexi Daily:
 I cheated a little and went with diecuts for the letters - saved alot of time from masking. I needed an anniversary card for our 41st anniversary coming up next month, so this is what he will get. :) Fun technique Lexi - thanks for the great video!

Papertrey Stamp-a-faire: Mastering Drips and Splatters with Lizzie Jones

Hello! I am so excited about Stamp-a-faire this year! I am participating at home this year and hope to learn alot of new techniques - from the Papertrey Masters!

This is a card for Saturday's Mastering Drips and Splatters with Lizzie Jones:
 I went with blues and greens on my card. Very artistic technique - not sure it is one I will use often. I do like to do the small ink splatters occasionally. Thanks for the great video Lizzie!

Papertrey Stamp-a-faire: Watercolor Like the Masters with Kay Miller

Hello! I am so excited about Stamp-a-faire this year! I am participating at home this year and hope to learn alot of new techniques - from the Papertrey Masters!

This is a card for Saturday's Watercolor Like the Masters with Kay Miller:
 Not sure about all these bright colors! I think I need alot of practice on this technique - good thing I have Kay Miller's video to watch over and over again! Hope you are enjoying the SAF day! I know I am!

Papertrey Stamp-a-faire: Pointillism Play with Heather Nichols

Hello! I am so excited about Stamp-a-faire this year! I am participating at home this year and hope to learn alot of new techniques - from the Papertrey Masters!

This is a card for Saturday's Pointillism Play with Heather Nichols:
 What a fun technique! Took alot of time to stamp all those dots though!

Saturday, July 23, 2016

Papertrey Stamp-a-faire: Masterpiece Inspirations with the Team

Hello! I am so excited about Stamp-a-faire this year! I am participating at home this year and hope to learn alot of new techniques - from the Papertrey Masters!

This is a card for Saturday's Masterpiece Inspirations with the Team. I chose Kay Miller's inspiration picture by Georgia O-Keefe. I used year of Flowers: Violet instead of the poppy.The center oval is popped up from the background and the center of the flower is sparkly. :)
Thanks for stopping by!

Papertrey Stamp-a-faire: Floral Impressionism with Melissa Phillips

Hello! I am so excited about Stamp-a-faire this year! I am participating at home this year and hope to learn alot of new techniques - from the Papertrey Masters!

This is a card for Saturday's Floral Impressionism with Melissa Phillips:
 I'm not sure this counts towards Impressionism - is Impressionism always soft colors? I do not have the Floral Sketches stamp set, and tried using a couple other floral sets I have (Nostalgic Notions and Forget Me Not), but wasn't satisfied with the results. I pulled out an old favorite - Leaf Prints - and tried the technique with it. I like the results - just not sure how "Impressionismy" it is. :)

Papertrey Stamp-a-faire: Gilded in Gold with Danielle Flanders

Hello! I am so excited about Stamp-a-faire this year! I am participating at home this year and hope to learn alot of new techniques - from the Papertrey Masters!

This is a card for Saturday's Gilded in Gold with Danielle Flanders:
 I had so much fun putting Liquid Leaf on these diecuts! I made a whole bunch of them, which I will have on hand to use on projects! 


Thanks for the great video Danielle!

Supplies: (all PTI) Enclosed: Joy die and stamp set, Tiny Tag die, Holiday Flourishes and Swirls patterned paper and Liquid Leaf by Plaid

Papertrey's Stamp-a-faire: Starry Night with Amy Sheffer

Hello! I am so excited about Stamp-a-faire this year! I am participating at home this year and hope to learn alot of new techniques - from the Papertrey Masters!


This is a card for Saturday's Starry Night with Amy Sheffer:
 What a great tutorial Amy! I have always wanted to do this and am happy with the results. Thanks so much for the wonderful video!
Hope you all are enjoying the fun!

Thursday, July 21, 2016

Papertrey Make-It-Monday #256: Spritzed Stamps

Hello! I am down here in my craft room gearing up for Papertrey's Stamp-a-faire Saturday, and I decided to make a card for Melissa Phillip's Make-It-Monday this week. Melissa showed us how to ink up a stamp and then spritz it with water and then stamp onto watercolor paper to get a pretty soft look to the image. You can watch Melissa's video here.

I used the Daydreamer stamp set to make the flowers on this card. The flower I decided to use did not have a detail layer, so after stamping my flower with the spritzed stamp, I went back in after it was dry and re-stamped the flower without spritzing it. I also spritzed the stems and leaves of the flowers. The sentiment is from Melissa's set, Choose Joy. I just love the sentiments and images in that set!
Have a great week! Thanks for stopping by....

Friday, June 3, 2016

Teacher Appreciation cards

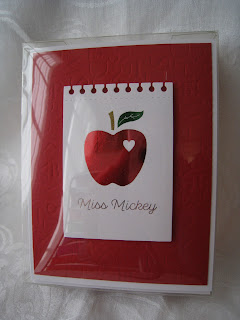
Hello! I recently watched a video by Jennifer McGuire on how to foil in different colors. You can see the video on her blog here. I just loved the teacher appreciation cards she made, and she provided a free download so you could make them too. I happen to have recently purchased a Heidi Swapp Minc Machine, and have been foiling all kinds of things, so I was excited to try out Jennifer's method. It is a bit time consuming to cut little pieces of foil for the different areas, and to carefully place them so they do not foil in the wrong area, but I love how they turned out!  Just so happens that my two granddaughter's were finishing up preschool this month and I made each of their teachers a set of these cards. They turned out sooo cute!
 I used a PTI impression plate in the background.
 I personalized the card sets for their teachers with the teacher's names.

 I packaged them in sets of four in a clear Papertrey card box along with 5 envelopes.

My daughter said the teachers loved them! Thanks for stopping by!