Thursday, July 26, 2012

Fun With Washi Tape

Hello! I've been hoarding collecting washi tape for a few months now. I love the look of it, but every time I go to make a card with it, I hate don't like the results. I guess I just don't quite know what to do with it. So I spent some time on Pinterest and the web this evening checking out ways that people use washi tape. I decided to cover a tag with it. I cut a tag with my PTI Tag Sale #2 die using white cardstock. Then I covered the tag with washi tape in a diagonal slant. That went ok, but there were alot of loose ends to trim afterwards. Then I decided to cover a half sheet of cardstock with the tape and then cut the die cut out of it. That worked much better - no loose ends to deal with. :) So I did a sheet with pink washis, and then another sheet with some number washi tape my daughter had purchased at PaperSource for me for Christmas. After looking at the PaperSource website, they also sell the pink tapes I used. I had purchased mine at Archiver's.

Here is a picture of the cards I made using the tape, and then using the die cuts.
 The card on the left just uses some tape to hold the frame in place. On the card on the right, the actual frame is made with one of the covered pieces of cardstock and my Fabulous Frames die. Stamps sets used are PTI Little Bitty Bird & Additions, Hello Sunshine, Heart 2 Heart #6, and Bitty Backgrounds. Dies are PTI Just the Ticket and Fabulous Frames.

Here are a bunch of other die cuts I made out of the washi covered cardstock. I'm going to use the number ones on the right with the saying from Dawn's new Signature Set "Age is just a number". I think that would make some great birthday cards for my friends. :)

The washi tapes I used are pictured below the tags. (I forgot to include the blue/green/whte chevron tape, but it's just another color way of the pink one pictured)

Anyway, I'm glad I finally figured out something to do with all this tape I have - can't wait to play more! Thanks for looking!

Wednesday, July 25, 2012

Stamp-a-faire Mini book

Hello! I would like to share the mini book I made to document the Papertrey Stamp-a-faire 2012. I had seen others on the PTI forum make similar books to hold the SAF badges and other memories, and I decided to try my own. You can read more about the individual challenges on Nicole's blog post here. I am thrilled with the results! Hope you like them too!

I started with a mini book layout using Christina Kowalczyk's example here. I made mine a horizontal layout instead of vertical. I mostly used the PTI stamp set Summer Camp.
Here is the book front, with the jute tied around it to keep it shut..
 Front without the closure.
 Left side explains all about the Stamp-a-faire, right side is a group picture of our group that day.
 All about the day.
 This is what the book looks like from the top - it's an accordion type layout.
 Group shot.
 Knots Badge and Memory Preservation badge. I just took pictures of my projects for each challenge. the Projects themselves were too big to fit in the book.
 Friendship Badge and Craft Conservation Badge.
 Card Set Correspondence Badge and Rainbow Badge.
 DIY - Make your own Embellishment Badge and my name tag.
 The rest of the pages are pictures of people that attended the SAF day in Centreville, VA with me. Lots of friendships made that day. :)


Monday, July 23, 2012

Papertrey Stamp-a-faire challenges

Hello! Thanks for stopping by my blog! I have some of my projects to share with you from the PTI Stamp-a-faire day this past Saturday - July 21st. I am listing all my challenge projects on this blog post, so you may have to scroll down to see a specific one you are looking for. Thanks for stopping by! Enjoy your day!

Morning Make-n-Take Challenge Read about it here.
Knots-Badge
Knots Badge - Ribbon Techniques. I chose to make Melissa Phillips's knot leaves. They were super easy! Thanks Melissa! Read more about the challenge here.

Memory-Preservation-Badge
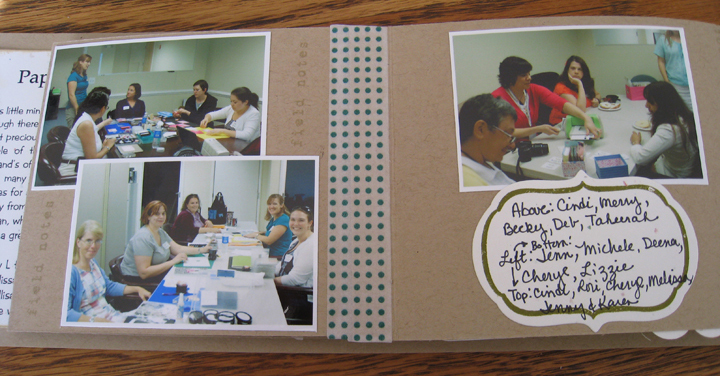
Memory Preservation - Mini Books. I love to make mini books, so this challenge was exciting for me. I tried out Betsy's Card Basics book first, and totally screwed it up - LOL! So I tried Ashley's envelope mini book next. I still made a few mistakes, but was able to cover them up with Washi tape. :)  I've seen so many people on the Inklist that have FINISHED mini books! I am amazed! It takes me forever to think one out and execute it. So all I have done so far is to put the base of the book together. So here are some pictures of the envelope book: Read more details about the challenge here.


Craft-Conservation-Badge
Next up was the Craft Conservation challenge - using a limited and specific set of items in your card. You can read more about this challenge here. Here is my take on it.
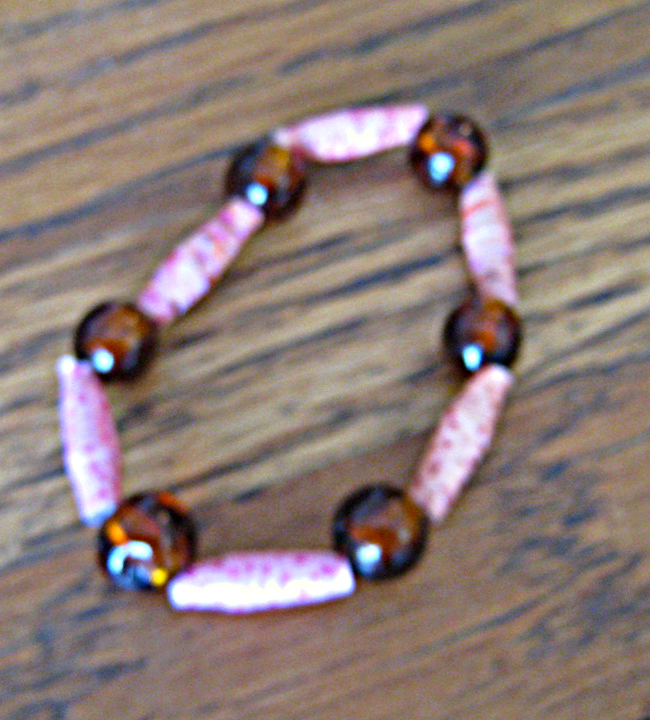
Friendship-BadgeNext up is the Friendship challenge - the beaded bracelets. I was excited and apprehensive about his one. I received the die and paper in my SAF tote bag and was excited to learn how to make these beads. But I was apprehensive because I did not want to start collecting jewelry making things in addition to all my papercrafts. It turned out that I did not buy the proper size beads to go with the paper beads, so I was a little disappointed in that. But I think I'm going to think up other ways to use this paper and dies so I don't have to start making jewelry. Maybe I'll just make up some beads and have one of my jewelry making friends make it into something for me. :)


Rainbow-Badge

The Rainbow Challenge was next. I wasn't crazy about the first two techniques, but the shaving cream one sounded like fun. So me and two other ladies jumped in. I was amazed at the designs produced with the shaving cream and re-inkers. I used two old Stampin Up reinkers for the project - Old Olive and Bermuda Bay. After the papers were dry (I made three A2 size papers from one batch), I used different die cuts to cut out custom embellishments. I cut out butterflies, numbers and flowers. Here is a card I made using those embellishments. I think it is kind of fun! The only thing that worries me is whether the smell of shaving cream will go away. Not sure what someone will think if they open up a card and it smells like shaving cream!
Correspondence-BadgeCamp Card Set Challenge This challenge was to create a set of cards and package them pretty packaging. There were several really cute options presented in videos. I chose to do the technique Jess Witty presented. I had a hard time getting the butterfly to emboss on the card front where I wanted it, so I decided to cut out the butterfly instead and back it with some of the PTI patterned paper. I didn't have any glassine bags, so I used vellum envelopes instead. I am really happy with the results - I especially like the little butterfly stickers included in the package! Thanks gang - for such great ideas!

This is the set of four cards and the smaller envelope with the butterfly stickers.
 This is the package front of the set in the vellum envelope. I love how you can see the cards through the packaging!
 This is the package back. I used a little butterfly sitcker to seal the back.


DIY-Badge
The final challenge I was able to complete was the DIY challenge. It involved making homemade embellishments. I chose to make badges similar to Heather's. I used a buttonhole stitch around the outside instead of the running stitch and used die cuts from Bitty Baby Blessings for the centers. I am expecting a grandson in September and I think these will look cute on his packages. :)

I was also able to make Melissa Phillip's little felt bows as embellishments. These are so cute!

Thanks for looking at all my projects! I learned alot of new things during the Stamp-a-faire. I hope to put these new ideas and techniques to use in my papercrafting soon. Thanks to Papertrey for an AWESOME event!

Friday, July 20, 2012

Papertrey Stamp-a-faire 2012

Hello! This blog post will be all about the Papertrey Stamp-a-faire 2012! I am so excited to be able to participate in a group of 19 ladies in Centreville Virginia for tomorrow's festivities! I have been making lists and kits for weeks, and am finally all packed. Here is a photo of the back of my car - all packed and ready to leave my home at 6:00am tomorrow morning to head for Centreville! Yeah!
Well, what a day it was! I can't remember when the last time was that I laughed so hard! A group of 19 ladies got together in Centreville Virginia to stamp, laugh, talk, eat, and learn this day. It was SO fun getting to know people who I had seen only online in the PTI forums! Now those faces have a name, a personality, and have become friends. What a joy it was to share our love of stamping and Papertrey with each other. :) A BIG shout out to Jen and Cheryl for making this get together possible! They had everything well thought out and arranged when we got there at 7:00am this morning.  Here are a few of the pictures from the day, starting with a group shot of most of the ladies that were there.
 Above: Cindi, Lori, Cheryl, Melissa, two of Cheryl's crafty friends Jenny & Karen
 Lizzie - all smiles. :)

 Jenn, Michele, Deena, Cheryl, Lizzie
 Lori, Cindi
 Jenn, Michele, Deena
 Lizzie, Jenn, Melissa
 Deb, Merry
 Becky
 Lizzie
 Taheerah, Amy
 Merry
 Monica & her son

We didn't get as much stamping done as I had planned for, but we sure did have a great time getting to know each other! And in the end, that's what really counts, and that's what made the day so special. Hello to all my new friends, and can't wait for next year!