Saturday, March 29, 2014

Watercolor Fun

Hello! I jumped on the watercolor bandwagon the other day after seeing so many gorgeous watercolored cards on blogs and forums. I went to Hobby Lobby and purchased a fairly cheap set of watercolors, a small 4 x 6 pad of watercolor paper and some inexpensive brushes. I saw a thread on the Papertrey forum that had a link to this video by Jennifer McGuire on watercoloring over sentiments. The forum thread suggested using this technique on Wet Paint, a Papertrey set I recently received, so I thought I would give it a try. I have a long way to go on the watercolor road, but here are a couple futile attempts.
 This one used a stencil I had bought recently at a quilt show. For some reason, I feel the need to distress the edges of my watercolor piece. Not sure why...
This card uses Year of Flowers: Rose, and Wet Paint sets. It was pretty easy to watercolor over the love sentiment.
This card uses the Bold Bouquet anniversary set, and again Wet Paint. Love the rainbow look on the sentient. I tried to recreate the rainbow colors with the flowers, but not entirely happy with that. I am used to things being clean and clear - guess I'm trying to adjust to the "looseness" of watercolor!  I am entering this card for Papertrey's Make It  Monday #158 - Stamping with Watercolor Mediums. I just painted the watercolors onto the stamps (flowers and leaves) with my watercolor brush. Thanks for looking! Hope you are having a wonderful weekend!

Wednesday, March 26, 2014

Papertrey Stitched Butterfly and Egg Barrettes

Hello! I've been playing with my new Papertrey Stitched Butterfly and Egg dies, designed by the one and only Erin Lincoln. I used the Clever Barrette dies and the Butterfly die to make a barrette for my granddaughter. I really like how this one turned out. So pretty for spring and Easter!
 The egg die was a bit big for the Clever barrette - it mostly covered the whole thing up - so I decided to try to make a barrette out of just the egg itself. The first time around - the egg on the right - I used some non-Papertrey felt (I know - shame on me!). The stitching holes on this die in particular are very close to the edge of the diecuts, and some of the holes tore through when I stitched around them. If you look at the close up of this egg, you might be able to see that I did a blanket stitch around the edge - trying to seal the two outer layers together.
Below is the non-Papertrey felt egg, blanket stitched around the edge. Edges of the felt were more fuzzy than the Papertrey felt.
 The egg above was done with all Papertrey felt, and still had some issues with the holes tearing, but not as bad as the first one. I did a regular back stitch around the edges of this one.
In order to make these into barrettes, I cut out a second whole egg - this one without the inside holes - and cut a small slit for the clip to fit through. I used the 2" clips that I use in the Clever barrette, and they just barely fit inside. It would be nice to find a 1 1/2" or 1 3/4" clip to use instead. I tried little 1" clips I had on hand for baby barrettes, but the egg ends flopped around too much.


I'm sure the egg dies would work wonderfully on paper, but they were a challenge on felt. Alot of stitching involved too. Maybe it would be nice to make one of the plain eggs with a heart on the front instead. I'll try that next. These barrettes will go in my granddaughter's Easter basket. Thanks for looking!

Tuesday, March 25, 2014

Spicy Spiral Table Runner

Hello! I took a class at my quilt guild last Thursday to make a spiral table runner.

The project used a technique called Bargello. I had seen Bargello quilts before, and thought they were amazing, but had never tried the technique. That's mostly the reason I took this class. Our homework for the class was to sew 4 strip sets of 8 different fabrics, light to dark, of varying widths specified in the pattern. Once we got to class, we used a special 10 degree ruler to cut our strip sets into different length wedges, which were specified in the pattern. Then it was a matter of sewing the wedges together, which was really just sewing straight seams. The class started at 10:30 a.m., and I was done with the table runner top by 1:30 p.m. It is 42 inches by 25 inches. I spent today putting the backing and batting on, and quilting it. I am really happy with it, and ready to start on another!

Thanks for looking! Hope you are having a great day!

Friday, March 21, 2014

Lunchbox Die Sewing Kit

Hello! I am excited to show you the latest thing I have come up with using the Papertrey sewing dies. After making a few coin purses, I decided to try something else new. I was thinking about making a little needlecase with the Lunchbox die, but instead ended up making a little sewing kit to keep in my purse. These would make great gifts also, as sooner or later, most everyone needs to sew on a button or fix a problem with a garment when away from home. Here is the finished project, and then instructions on how I made it. It all came together in less than an hour.
 
The first thing I did was to fuse some of the Pellon Vinyl Fuse to the piece of fabric I wanted to use for the sewing kit. Then I used the Lunchbox Die to cut the fabric.

 I then used one of the shorter Stitching Lines dies to cut holes where the two larger pieces fold.
I then cut out two coordinating pieces of Papertrey felt sized 2 1/4" x 3 1/2". I then diecut the holes about 1" in from one end of the felt using the Stitching Lines die again.


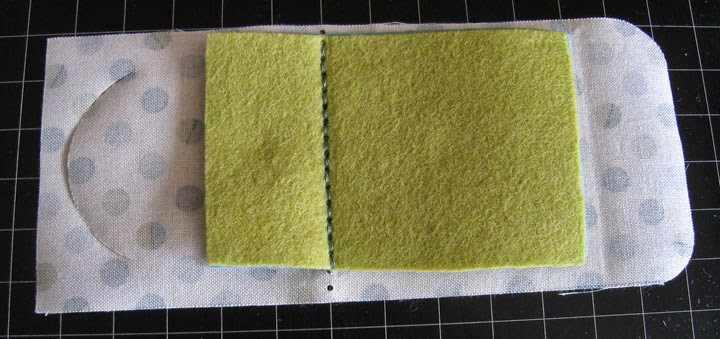
I then lined up all three lines of holes - the two layers of felt on the top and the lunchbox diecut fabric on the bottom, wrong side up.

I then stitched through all three layers using a back stitch and coordinating thread.

 I sewed three random buttons on the 1" side, just stitching through them once and knotting on the back of each button, so that if you snip one off, the rest stay put. I put a needle on the other side of the top felt.
 I then wound some white, gray and black thread around two of my fingers and slipped them on the underneath layer of felt. They stick to the felt pretty good without anything holding them down.
I added a small piece of stick-on Velcro to the top and bottom of the outer layer of vinyl fabric for a closure. I would have used a Velcro dot if I had one, but I didn't, so I just used a bit of what I had.


  I would recommend using Fray Check around the edges of the fabric to prevent fraying. That would also be a good idea on the edges of any fabric coin purses you make. It's available at any of the big box fabric stores in the notions section. It's clear and doesn't show at all when it is dry.
I'm going to make a bunch of these to give out to my friends and my daughters. They are always handy. One more thing I might add is a safety pin or two clipped on to the page that had the needle. Thanks for looking!


Wednesday, March 19, 2014

Papertrey Make It Monday #156: 3D Stamp Paint Techniques

Hello! I am trying out Melissa Phillip's 3D paint technique today over on Nicole's blog post here for Make-It-Monday. I did not have any of the specific paint Melissa used on her card, so I improvised with what I had. I mixed up a blend of these two items to get a textured gritty paint, which I then applied to the Damask impression plate and ran through my Big Shot onto a piece of Raspberry Fizz cardstock.
After it dried, I then proceeded to cut out Text Block: Birthday from the pink impressed cardstock. I decided to inlay the text Block, so I cut it out again from white cardstock. It was kind of tedious piecing all the little pink "innards" back into the text block, but I really liked the results! I then tied some pearl cotton around the card for a little embellishment. The bonus part is that I have the pink text block to put on another card!


Thanks for looking! Hope you are having a great day!

Tuesday, March 18, 2014

Vinyl Covered Coin Purse

Hello! I would like to share with you a technique I used to make a vinyl covered coin purse today. I do not have the Papertrey Coin Purse Dies yet. I made this coin purse using a pattern I have and my sewing machine. But the technique I used to take regular cotton quilting fabric and fuse vinyl to it is what makes this little purse special. 

There is a thread on the Papertrey Forum, started by Erin here, that showed a fusible vinyl material from an online source. Someone else on the thread thought they had seen a similar product at theiir local Joann's. I was out and about in town today and had some time to kill, and stopped at our Joann's to check it out. Sure enough, they carried a similar product made by Pellon - a company that makes all kind of stabilizers. I bought a yard and a half, using my 40% off coupon - regular price was $5.89 per yard. Here is what the product looks like:
 I cut a piece out the size of my purse fabric and followed the directions on the package to fuse the vinyl to the fabric (took all of 8 seconds to fuse). Just look at how awesome the fabric pieces turned out! They are vinyl coated, yet not stiff - still soft and flexible.


I used a scrap piece of the vinyl covered fabric to cut out a stitched heart from the Coffee Cozy dies -it cut beautifully! I think it would work well with the new Coin Purse dies. Just think of all the cute custom fabric purses you could make from different fabrics!

 And this is how the little purse turned out. My little granddaughter loves owls, so this will go to her. I love the fact that it's easy to wipe clean and sturdy enough to take a beating.
Thanks for looking!

Monday, March 17, 2014

Happy St. Patrick's Day!


Hello! I wanted to stop by and wish everyone a Happy St. Patrick's Day! I made cards for my three children and for my grandchildren. Thought I would share them here.


This is the card I sent all three of my children. There is glitter on the shamrock, and the "Sparkle" is heat embossed with green sparkle embossing powder. The inside has an Irish blessing from WaltzingMouse:

"May you have all the happiness and luck that life can hold,

and at the end of all your rainbows may you find a pot of gold."


                                                                                                                                                               And these are the two cards I sent my grandchildren. The one on the left was for the three in Virginia, and the froggy is for the one in Philadelphia. Both of these cards are made with shapes from the Silhouette library.
And here is a picture of my little 2 1/2 year old granddaughter. I hope it makes you smile like it did for me!
 

Supplies:
Sparkle card: Papertrey white cardstock, PaperSource shamrock stamp, sentiment from Building Blocks set - Papertrey, Judikins Forest Twinkle embossing powder, New Leaf ink - Papertrey, Versafine Black Onyx ink

Lucky cards: Papertrey white cardstock, shapes, patterns from Silhouette online store.

Sunday, March 16, 2014

Coin Purse craze

Hello!
I was excited about the coin purse dies created by Erin Lincoln over at Papertrey and lots of ideas started running through my head. I love the little stitched dies she has created to embellish the purses as well as the barrettes. That got me to thinking "What other Papertrey dies would look cute on one of these purses?" I was looking at Audrey's Pinterest board of coin purses/pouches and saw this lovely little one with a fox and a bird. Immediately I thought of Little Foxy and Little Bitty Bird. Now, I am not one for waiting (just ask my husband), and I had to try it out right away. I have a sewing machine, and am very comfortable with sewing, so I decided to use the basic principle of Erin's die to make a little purse. I used the Journaling Card 1 die and cut out two Melon Berry rounded rectangles. I cut Little Foxy out of Canyon Clay felt and his cheeks and the top of his tail from Vintage Cream felt. It's kind of like paper piecing - just stamp his face and tail on the vintage cream and cut out the sections you want to piece onto the rest of the fox. I used a little dab of glue to hold the little pieces on until I could whipstitch them down. I stamped Little Foxy onto my Canyon Clay diecut and began stitching him onto the front of the purse with a whipstitch, since there are no stitching holes. Here are some directions on how to sew a whipstitch by hand - it's really easy. Then I cut Little Bitty Bird out of Aqua Mist felt and stitched him on. I used matching embroidery thread for all pieces. I used white thread to stitch down the cheeks and the end of the tail. I made the eyes with black floss and a french knot. I stamped the "Hello There" directly onto the felt using Versafine Black Onyx ink.
This turned out pretty small 3 1/8" x 2 3/4". I think the one made with the coin purse dies will be a much nicer size. I am just so tickled by how cute this looks! Can't wait to get the actual dies for the purse! Thanks for looking!

Wednesday, March 12, 2014

W9 Cupcake Fun!

Hello! I purchased Sweet Treats from WPlus9 serveral weeks ago, and just this week was able to order the dies that go with it. I have loved making these sweet little treats! The cupcakes come together so easy, and I just can't stop using the "Seize the Cupcake" sentiment! So fun. The blug tag is from Lil' Inkers.
 I used a sparkly glitter pen on the petals and perfect pearls liquid for the icing. Aren't the little flags in this set so cute?
 This card uses the dies for the cupcakes and the stands. Glitter abounds! Background paper is Lemon Tart Bitty Dots from PTI. Love the "Happy, Happy, Happy" sentiment - always makes me think of Duck Dynasty! haha

 This card uses some cupcake patterned paper (My Minds Eye???) and washi tape for the little flags. The sentiment is from Bountiful Banners by PTI. Below is the inside of the card, which uses the W+9 cupcake and the cute sentiment.
Thanks for looking!

Tuesday, March 11, 2014

New Papertrey Goodies!

Hello! I have been playing with my new Papertrey goodies this week. I wanted to share some of the cards I've made and some of the observations I've made.
 This card was made using the new Building Blocks stamp set. Lesson I learned from this card: draw lines to make sure you get everything straight. It looks ok from a distance, but would look alot better if I'd taken the time to be precise.
 This card uses the new Text Block:Birthday die by Lizzie Jones. I decided to go tone on tone, and used Aqua Mist and Tropical Teal paper. I cut my diagonal striped background with my Silhouette. Papertrey released three different coverplates this month - a diagonal one, a horizontal one (see below) and a vertical one. I challenged myself to figure out how to cut these on my Silhouette instead of spending the money on the coverplates. Once I had the measurements, it was pretty simple to design my own. I am happy with the horizontal and vertical cuts, but the diagonal one is a little rough on the sharp points. I'm not sure if that's because I was using PTI's thick cardstock or what. I need to try it on a thinner cardstock.
 This card uses my vertical cut file for the background, and a pretty PaperSource paper called Rhubarb, mounted on a PTI Rustic Cream card base. Also used a quote from Melissa Francis. Again, I used Building Blocks for the sentiment.

This card uses my horizontal cut file for the background, and again uses the Rhubarb PS paper, mounted on a PTI Lavender Moon card base. The flowers are from the new PTI 2013 Anniversary set, "Bold Bouquet". Sentiment from Building Blocks again - so many great sentiments in that set!

This last card is my favorite. I pulled out Turning a New Leaf and paired it with the new PTI Button Stacks dies. Let me say i.just.love.these.button.dies! They make great buttons, hairclip decorations and FLOWERS! The little flower in the background is from Bold Bouquet. I stamped the leaves in New Leaf and Limeade Ice, and the little flowers in Aqua Mist with Hawaiian Shores centers.

And my favorite way to use the Button Stacks dies is with the Clever Barrette covers by PTI! These barrettes were made for my little 2 1/2 year old granddaughter. So fun!

Thanks for sticking with me on all these photos. I probably ought to blog them more often, but I have been too busy having fun making them! Have a great day!